Clothing Budget: Lessons Learned

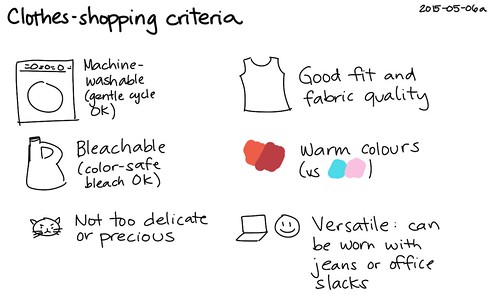
Having a clothing budget is more useful than I’d realized. It doesn’t just keep your spending in check, it helps you spend more wisely, too. Not solely because your spending is limited, but because keeping records of your incomings and outgoings allows you to look back and see which buys turned out to be the good ones, and which didn’t.

Fresco showing a woman so-called Sappho holding writing implements, from Pompeii, Naples National Archaeological Museum (14842101892) restored
I’ve had a clothing budget for just over three years now – $25 a month ($18 US), which covers pretty much everything but shoes. Each month I keep a record of what I spent, and – most importantly – on what. Brace yourself: things are about to get statistical.

In the three years I looked at, I spent $860 on clothes. (That’s about $625 US.) Which, frankly, seems like a massive amount! I made a list of each item I bought over the three years (divided by year), what I paid for it, whether it was new or second-hand, and whether I still wear the item or not – and if not, why.

I spent $40 on clothes which I am already no longer wearing. Actually, there’s another dress I’ve only worn once, but it’s a special occasion dress, so the verdict is still out on whether I’m avoiding it or just haven’t had many suitable occasions yet. If it turns out I am avoiding it, that’s $60 total I’m not wearing any more.

2015-05-06a Clothes-shopping criteria -- index card #shopping

Most common reasons for not wearing something any more? It doesn’t fit, or it doesn’t suit. That seems reasonable. Then I looked at the breakdown of new versus second-hand. It turns out that fully half of the second-hand items I bought in those three years I no longer wear (five of ten). But I’m still wearing 13 of the 15 new items I bought.

Why? My guess is that I’m a lot less picky when it comes to second-hand clothing, because it’s so much cheaper. But if I’m going to spend good money on something, it better be worth it! The decision-making process increases in length proportional to the price of the item.

In support of this theory, I note that the two new items I’m not wearing any more were a super-cheap t-shirt (this was before I started shopping ethically) and a zip for a second-hand skirt. Total cost, $6.60. In fact, the average price of the garments I’m not wearing any more is less than $7. Shocking.

Macke - Modegeschäft
Where things really got interesting was when I started comparing how many items I bought in each year, and how much I spent on average per item. Remember, it’s just this last year I’ve been making an effort to shop ethically.

In 2015 I bought 11 items at an average of about $28 each. (Buying a swimsuit pushed the average much higher than it would otherwise have been.)
In 2016 I was still in the red from the expenditures of the previous year, so I only bought six items – average about $38.
In 2017 I started shopping ethically, and here’s where you’d expect the prices to skyrocket, right? I bought eight items, for an average of about $40.

Overall, I did spend more in 2017 than in the preceding years, but that was still less than $20 over what I spent in 2015.

To be honest, the real cost to me in shopping more ethically hasn’t been the financial cost. It’s been the cost of planning, the cost of avoiding the easy buy and taking the time to find ethical options.

"Mrs. America buys clothes with care" - NARA - 515034
Side note: if anyone’s interested in encouraging the ethical shopping habits of Australasians, what would be really helpful is a guide to what can be bought where. Don’t just tell me XYZ has an A rating, tell me where’s good for buying pajamas, or socks, or collared shirts…

So those are the lessons my clothing budget has taught me so far: it’s worth taking the time to be sure about an item before buying it – no “close enough is good enough” buys; and shopping ethically isn’t that much more expensive.

Will I keep on with this? You bet! For one thing, in the next few years I’ll be getting some valuable data on how long various garments last. Because no matter how much I expect my clothes to be immune to the ravages of time, nothing lasts forever.

William-Adolphe Bouguereau (1825-1905) - A Calling (1896)
Especially socks.

Budgeting Clothing

Do you budget your clothing?
Not in the utility clothing kind of way – so many buttons permitted per garment, so many inches of stitching or feet of hem – but in the sense that you have a fixed amount of money each year that you can spend on clothing.

Florent Willems - The Important Response - Walters 37140
Realizing just how much she spent this year…
How does your clothing budget work – and does it work for you?

Upskilly & Stuff 2: The Apron

Rectangle, rectangle, string, string, string.

One big rectangle for the bottom part; one smaller rectangle (optional) for the upper part; and three ties: one to go round your neck (unless you opted out of the upper part or wish to pin the bib on in the old-school manner) and two to fasten the whole shebang around your waist.  1-2 rectangles + 2-3 strings = apron.

Tablier pour hommes sans poche bavette bretonne de chef

I actually cheated a bit: I cut the top part and the bottom part (bib and, er, skirt?) in one – a bit wasteful of fabric, but it worked for the piece I had.  Piece of fabric, bias binding for ties, and I was good to go – or was I?

The bias binding was, frankly, the colour of empty sausage casings; the fabric was bright white. Two problems there: one, they don’t go; and two, white is not a good colour for an apron unless you like to spend a lot of time soaking things in stain remover.

Solution: the left-over packet of dye from the triangle dress. Since the uncut fabric was too heavy (i.e. would have resulted in a lighter colour) I cut out the apron shape first, and then stay-stitched the raw edges (a line of stitches close to the edge, to control fraying & distortion), before flinging it, along with the bias binding, into the dye bath.

Observe the line of white stay-stitching.

Learning moment: bias binding, be it never so starchy, will lose its shape the minute you get it wet, and become little more than a tragic draggle. Incidentally, I was unsure to begin with whether the bias binding was natural fibre or something which wouldn’t take the dye. So I snipped a little bit off and set it on fire. General rule of thumb: if it burns, it’s dyeable. If it melts, you’re wasting your time, because a) it won’t dye and b) it’ll make a rotten apron. (Please observe due caution and common sense when setting things on fire.)

Once the dyeing was completed and the materials had dried (hanging on the line for a night, which tells you how hot it’s been here lately) I ironed them. Then I pinned one end of the bias binding (folded double) to one end of the top, and figured out how much I’d need for the neck band. (Never forget to add seam allowances.)

I cut the remaining piece in half for the ties, pinned the right sides of each piece together, sewed them into tubes and turned them right side out again. (I could have whipped the two edges together if it had stayed in the classic bias binding shape, but alas, it was not to be. Perhaps I should have staystitched that as well.) A bodkin can be useful for turning the tube (I used the safety-pin approach) but make sure that this is a sewing bodkin, and not a dagger, please!

Fairbanks Robin Hood giving Marian a dagger
Maid Marian wonders how to tell Robin he got the wrong kind of bodkin.
Then – you guessed it! – press ’em flat. Then back to the pinning: pinning a ‘hem’ like the one I used on the kerchief around the raw edges of the apron piece (thus concealing the stay-stitching, which failed to dye), and attaching the tapes in the right places. My piece of fabric was already hemmed top and bottom, so I had to figure out a way to attach the neck tape which wasn’t built into the hem. (I basically just gave the hem another fold with the neck tape tucked into it.)

Then the sewing! This went pretty well until I got to a corner where two sets of double-fold hem and a tape met. The fabric I’m using is something like a heavy canvas or denim, and it makes for some chunky folds. Had I thought of this earlier, I could have taken the sewing advice I saw once: put it on a piece of wood and flatten it with a hammer. But I managed to pass through the edge, and went back to sew the rest firmly in place afterward by hand. Also by hand (because I forgot at the make-a-tube stage): sewing the free ends of the waist tapes closed.

The exoskeleton models the apron, having just enough neck for it to work.

Ta da! It is done, finished, complete. As far as I can see, it has only two issues: the front gapes a bit (still, it’s an apron, not a bib) and it’s kind of… pink. It remains to be seen whether I find it too pink to wear or not.

But, whether I keep it or not, I’ve practiced measuring, cutting, hemming, messing about with bias binding and attaching tapes.

Next month: a simple skirt or slip!